Tips

Tip: How To Build A Golf Club

Ever wondered how to build up a custom club? Or perhaps just wondered how clubs are put together? Let’s have a look at the process.

A friend of mine wanted to custom make a set so we headed out to my backyard shed and got cracking. Don’t be afraid to roll up the sleeves and and have a go yourself. With a little practice and the right tools you could do the same.

What you will need…

– Club making glue (2 part epoxy)
– Ferrules
– Shafts
– Club heads
– Shaft cutter (I use a Dremel tool)
– Grips
– Grip tape
– Iron head wire brush drill bit
– Solvent (mineral turpentine)
– Cutting blade (hook) if removing old grips
– Masking tape
– Vice
– Rubber shaft holder
– Plastic container
– Rag
– Air compressor (not essential but handy)
– Bench grinder or file

Let’s assume that you are making these clubs from scratch using just the components (nothing put together yet). If you are actually doing a club repair these steps can be followed also.
A detailed article on how to put new grips on golf clubs can be found here (How to Re-Grip a Golf Club), so I will skim over this section.

What to do…

Step 1 Source components and supplies.

Work out what equipment you need and want then source your components. We went for Titleist 712 CB heads with KBS Tour 110 regular shafts, Golf Pride Tour Velvet Cord grips and ferrules sourced from eBay to match the shaft and head specifications.

Finding components is fairly easy on the internet and shipping internationally can save you a lot of money. You do want to make sure you buy from reputable sellers and double check that you have ordered all the components you need.

The next step is to buy the club making supplies. I have been using Mr Golf Grip lately and find them to be very good. Quick shipping and good prices. You will need glue, grip tape, solvent, a shaft vice grip and a cutting blade.

The rest of the supplies you can find at pretty much any hardware store.

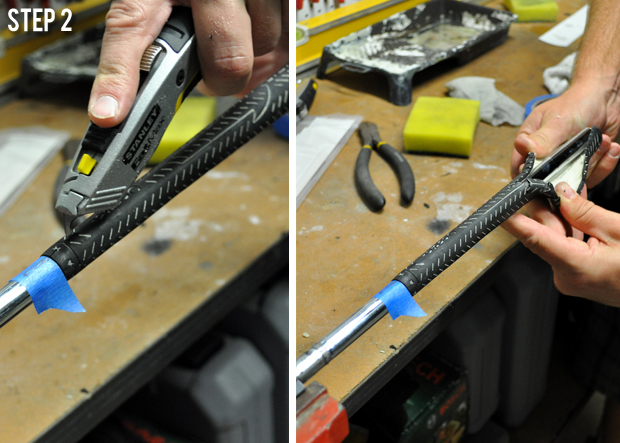
Step 2 Measure and cut shafts.

Make sure your work space is clean, dust free and clear of clutter. The best results come from careful preparation so take the time to prepare properly.

Measure your shafts and cut them to length. The shaft will typically come with a sticker telling you which iron they are intended for. You will need to cut them down to the length you require. Check out this handy guide for information on shaft lengths.

Custom Club Making, Golf Club Making

Golf Club Making, Custom Golf Clubs

NOTE: Always cut the length from the butt of the shaft with irons. When dealing with graphite shafts refer to manufacturer specifications. Some require tipping and then length taken from the butt. You can change the stiffness and characteristics of a shaft by trimming them in specific ways.

Golf Club Making, Custom Golf Clubs

TIP: I like to measure then place a tape line to cut along. Use a grinder or file to take off the burrs when you have finished cutting.

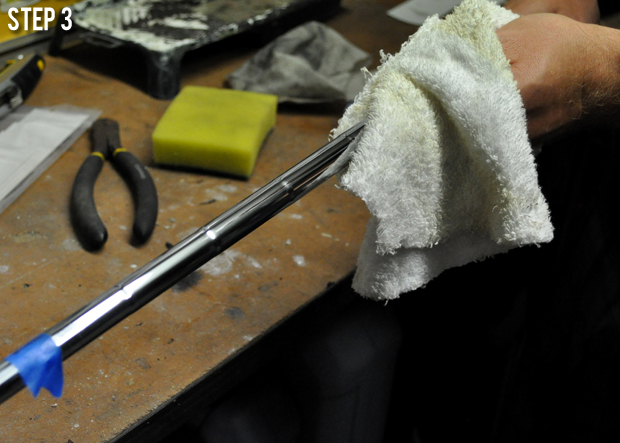
Step 3 Sand the shaft tips.

To ensure you have a good surface for the glue to adhere to, use some coarse sandpaper to thoroughly roughen the tip end of the shaft. Just make sure not to go to far up the shaft as you will see the scratches later (we don’t want that!).

Golf Club Making, Custom Golf Clubs

TIP: If you are unsure about how far to come up the shaft, place the ferrule and the iron head on to check. You could even mark it with a marker to make sure you don’t go too far.

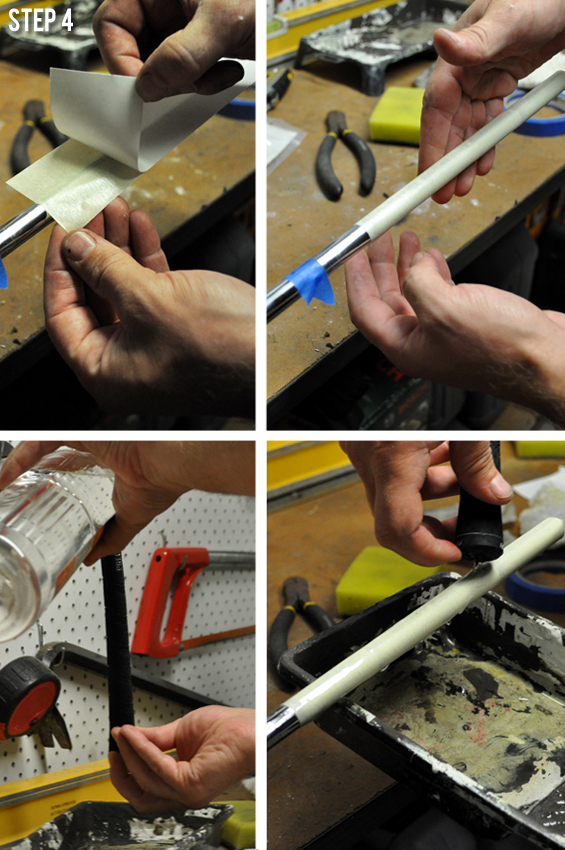
Step 4 Clean the surfaces to be glued.

As we sourced second hand heads, there was still a bit of glue where the old shafts had been pulled. Use a wire brush drill bit to clean out the old glue from the inside of the head. I like to also use some acetone to clean out any left over glue and dust from inside the hosel. A bit of rag wrapped around some wire works well for this.

Golf Club Making, Custom Golf Clubs

Step 5 Attach the ferrules.

Place a small amount of glue on the end of the shaft and push the ferrule on. Insert the iron head and continue to push until the ferrule is in place.

Golf Club Making, Custom Golf Clubs

Golf Club Making, Custom Golf Clubs

TIP: If you feel like the ferrule is not on far enough insert something narrow inside the hosel and mark how far down it goes. Compare the mark with the ferrules position on the shaft. If they don’t match try forcing it by holding the head and banging the butt of the shaft on a block of soft wood. This should enable you to get the ferrule in the correct position with the shaft fully inserted into the club head.

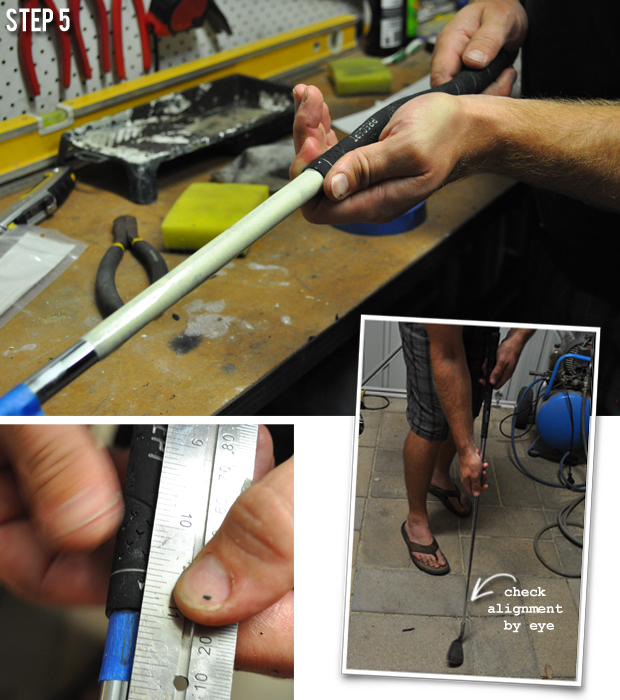
Step 6 Attach the head.

Roll the tip of the shaft in the glue to give good coverage. I like to also place some glue on the inside of the hosel to ensure even coverage to the entire surface. Push the head into place. If you have spine aligned shafts you will need to make sure you place them in the correct orientation. Leave the heads to cure.

Golf Club Making, Custom Golf Clubs

TIP: On some re-shafts the shaft has a cover or weight in the end or tip of the shaft. If the air has nowhere to go the club head will not seat in the correct position. It will feel hard to push down and spring back up a bit. You can drill a small hole in the weight or cover to allow air to escape.

Step 7 Align the ferrules with the heads.

Sometimes the girth of the ferrules may not quite match that of the heads. There might be a small step. Whilst this isn’t a problem in terms of performance, we want these clubs to look beautiful. Acetone can be used to smooth down the ferrules. Simply dampen a rag with some acetone and turn the club around in your hands, lightly rubbing the ferrule. The acetone works to incrementally dissolve the ferrule, slowly shrinking it. Work slowly here, don’t rush it. Keep turning the head until you are happy with look and feel.

Golf Club Making, Custom Golf Clubs

Step 8 Apply grips.

Please refer to this article for detailed instructions: How To Re-Grip A Golf Club.

Step 9 Attach the shaft stickers.

Decide on your preferred position. Most people like to place it at the back of the shaft so that it’s not visible at address. It’s really up to you.

Golf Club Making, Custom Golf Clubs

Step 10 Allow to dry.

Don’t be tempted to use them too early. The glue needs time to set for the strongest bond. Refer to the glue manufactures recommendations. 5 minute epoxy will set faster but will have a slightly weaker bond compared to 24 hour epoxy.


That’s it! Now you can hit the course with your custom set of clubs. Not only will you know how your clubs have been put together you will also know how to fix any potential future problems.

Don’t be afraid to have a go at club repair. Once you gain a bit of knowledge and experience, you’ll be hooked. You might even find it will save you a heap of money and time.


Luke @ Golf Blog Australia

Custom Club Fitting

As you probably know technology has really changed the way we select golf clubs. I know of many golfers who play regularly, who have simply walked into a shop and bought a set of clubs off the rack without being fitted. This seems mad to me. Golf is a difficult sport anyway, why not give yourself the best chance of playing well?

As I already know the advantages to getting fitted properly, I thought I would take a trip to one of my local golf stores to have a chat and do a fitting to show you how it works and see if I could learn something new.  I contacted House Of Golf (Epping) where I spoke to a Matt, a great salesman who was more than happy to oblige in helping with the process.

I must admit, the thought of getting a full fitting scared me a bit. Will I be hitting it well? Will the results I see reflect what I see on the course? How much will it really help my game? So, let’s find out what it’s all about.

The first thing that struck me was the personal nature of the fitting. It started with a lot of questions about me and my game. In particular what I was trying to achieve. This gave Matt a good idea of my attitude and the direction I wanted to take my game. I was quite clearly looking for a ‘players’ club that offered some help. Their range is very extensive so narrowing the choices down quickly is a really good thing.

A quick measure of my height and arm length established the correct length of shaft I should be playing.

He then went on to look at my swing and assess the type of club that would suit me. I was given quite a few practice swings to warm up and when I felt like I was swinging okay he gave me a club with a funny looking blue box on it. This would measure the swing speed, tempo and flex in the shaft. As I have covered before, the shaft can have a real impact on the flight of the ball.  I personally feel that this is the most important factor for your new set. After measuring a few swings he entered the results into the computer program and found my ideal shaft options.

Custom Club Fitting, House Of Golf

This process also gave Matt a chance to see my swing and think about head options to match all the things we had discussed. The computer also gave its suggestion and that is where we started. After hitting a few models that we thought would be the best options, we made a decision on the head.

Custom Club Fitting, House Of Golf

The next thing to see was the lie angle. He placed a white strip on the bottom of the club. I proceeded to hit a few shots off a hard plate. This measures the lie of the club at the point which I strike the ball. Clubs can be adjusted ‘flat’ or ‘upright’ to match the players swing.

Custom Club Fitting, House Of Golf

Matt then went on to measure my grip size. He stated that too many golfers don’t even consider this as a factor.

After hitting a heap of balls with the chosen club the computer analysed my distances, spin rates and smash factor. The computer program then suggested full club options from 3 iron to wedges. Giving us some choices of the wedge gapping. I chose my wedges on a distance factor rather then a loft factor. This would involve ordering my wedges to be custom bent to the angles that suit my swing. These clubs can then be equally spaced leaving me no awkward distance gaps in my set.

Custom Club Fitting, House Of Golf

After all of that the irons and wedges were decided upon and I thought we were done. Wrong. Matt was very keen to look at putters. He says that custom fitting a putter is really important. As we all know almost half of our shots are on the green so getting the right putter is vitally important. Now, I must admit, I have never considered this before. I’ve always just used one straight off the rack. We went over and had some further discussion about my putting and chose a few models that I preferred. We used a board to see where my eyes were lining up and the data told us that some putters would be a better option than others.

Next we went back to the launch monitor and Matt fitted me up for a driver. This was relatively straight forward because we already had so much information about my swing and because the adjustable nature of drivers makes them very accommodating. Matt selected a few drivers and we adjusted them to match my swing to get the optimal launch angle and spin rates. After hitting a few, I decided on the driver that felt, sounded and performed to my liking.

Custom Club Fitting, House Of Golf

Matt was leaving nothing to chance. We then discussed the importance of balls and which models might suit my game and preferences.

All in all, Matt was very thorough. What I really liked about this fitting is the time he took to understand me and my game – not just look at the computer generated numbers and make recommendations based on them alone. He showed a genuine interest in me and helping to find the clubs that will improve my performance.

Based on my experience, I would recommend any golfer get a custom fitting when buying a new set of clubs. I found it insightful and interesting.

Of course, if you’re local to Melbourne, then be sure to visit Matt at House of Golf (Epping).

Custom Club Fitting, House Of Golf

This is Matt. Go and see him for a fitting on your next new set of clubs.

Luke @ Golf Blog Australia

Tip: How to fix ferrules

I’m sure that most golfers would have had this problem at some point. You look at your club and the ferrule has come up or lose. The first things that slip into your mind are; is the head coming off? Is the shaft breaking? Or maybe just – my beautiful clubs don’t look as good as they could.

golf ferrule, how to fix golf ferrule

Don’t worry. This is a fairly common problem and one that is easy to fix.

Firstly, let’s check if the head is actually coming off. There are two ways you can do this:

1) Put the head between your feet and try to twist the shaft. Is there a clicking sound? Does the shaft move? If so, stop using it and re-set the shaft (I will be covering this soon).

2) Check the length has not changed by placing the club next to the clubs either side of the club. For example, if it is your 8 iron, stand it next to your 7 and 9. Look at the length of the clubs.  Does the size graduation look right? Does it fit between them evenly? If not, the head may be coming off.

length of golf shafts

You can see here that the lengths are equal and even. Pictured is my 6 iron to Pitching Wedge.

These are not fail safe tests, however, it is most likely that it’s just the ferrule coming lose. Now, let’s fix that.

What you will need:

– Grip cloth or a rubber glove
– Hair dryer
– Epoxy glue (optional)
– Toothpick (optional)
– Acetone and a rag (optional)

Step 1:

Use the hair dryer to gently heat the ferrule in order to break the glue bond. Yes, it did pay off buying the missus a good hair dryer for her birthday! Slowly does it here, you don’t need too much heat. Just enough to loosen the ferrule so heat and try, heat and try. You may not even need any heat. I moved one of my ferrules back into place without any heat (this is where you would use glue to re-set it – see below).

Alternate Method

Mix up the epoxy and using a toothpick carefully place the glue around the bottom of the ferrule (between it and the club head). Slide the ferrule back into place and clean up any excess glue with acetone.

golf ferrule, how to fix golf ferrule

Step 2:

Use your grip cloth or rubber glove to twist and push the ferrule back into place. This can take quite a bit of force. Get a good grip and go!

golf ferrule, how to fix golf ferrule

Step 3:

You’re done. Hit the course with your awesome looking clubs.

golf ferrule, how to fix golf ferrule


Luke @ Golf Blog Australia

Tip: How to Re-Grip a Golf Club

It makes sense that one of the most important components of a golf club is the grip – it’s the only part we actually have any physical connection with.

I have changed my own grips before and to be honest, it’s not that hard. Cheap, easy and rewarding (as is the case with most jobs you do yourself). There’s certainly no need to be afraid of giving it a go.

A friend of mine has been playing with the same set of clubs for a very long time. The other day I noticed his grips were shiny, hard and cracked – probably due for a change about 10 years ago! – so I offered to help him out.

You can use grip tape or rubber cement to attach grips. I have incorporated directions for both methods in my tutorial below.

What you need:

– Grips
– Grip Tape
– Solvent (Mineral Turpentine)
– Cutting Blade (Hook)
– Masking Tape
– Vice
– Rubber Shaft Holder
– Plastic Container
– Rag
– Air Compressor (Not essential but handy)

What to do:

How to re-grip a golf club

STEP 1 Secure your club and mark the alignment.
Secure your club in the vice using the rubber shaft holder. Don’t over-tighten the vice as you may damage the shaft. Just make it tight enough to hold it in place. A lot of grips have marking which need to be aligned with the face of the club and set square.
TIP: Place a piece of masking tape around the base of the grip (on the shaft). Use a ruler and mark where the old grip is set. This will allow you to align the new grip exactly like the old one. If you feel comfortable you can always align it later on by eye.

How to re-grip a golf club

STEP 2 Remove the old grip.
Cut the grip off using the cutting blade. Try not to cut into the shaft, particularly if you are working with a graphite shaft. A hook blade will make this much easier. Start at the bottom and cut back up towards the butt of the club.
TIP: If you have an air compressor, and your grips are still in good condition,  you may be able to remove them without damage by inserting a small air tool into the back of the grip to break the bond and then sliding them off.

How to re-grip a golf club

STEP 3 Remove the old grip tape or adhesive.
Remove the old grip tape or adhesive. This can be the hardest part of the job. To make it easier you can use a  plastic scourer dipped in mineral spirits. Make sure that the shaft is clean and free of any residue or dust. Take extra care when working with graphite shafts not to damage the shaft.

How to re-grip a golf club

STEP 4 Prepare the new adhesive.
Peel the backing off one side then place the tape onto the shaft. Carefully remove the backing from the second side. Wrap the tape around the shaft making sure it is even and there are no bubbles (not the end of the world if you do get a small one).
Pour some of the mineral spirits into the grip. Don’t forget to put your finger (or a tee) over the small hole in the butt of the grip so the spirits remain trapped inside. Shake the grip to coat the inside. Remove your finger (or tee) from the hole then pour the mineral spirits onto the grip tape (this will make the sticky glue on the tape slippery for a while).

How to re-grip a golf club

STEP 5 Put the new grip on.
Slide the grip onto the club, ensuring that you have pushed it all the way down. Align the new grip markings square with the clubface or if your placed masking tape to show you where square is then line them up with the mark you made on the tape. This can be easier if you remove the club from the vice and hold it facing down. Leave the club to allow the glue to bond. I generally wait overnight.
TIP: If you are having trouble getting the grip onto the shaft and aligning it, an air compressor makes this step very easy. Just attach the air nozzle into the hole in the butt of the grip and blow as you slide it on and align the grip.

STEP 6 Clean up.
Use a rag to remove any excess glue or spirits. Remove the masking tape you used for alignment.

I hope you find this tutorial useful and your re-gripping project rewarding.

Luke @ Golf Blog Australia

Tip: What Causes Slices and Hooks

Whether you’re looking to introduce some handy new shots into your game, or are simply trying to correct the wayward ones, understanding what causes hooks and slices can be really beneficial.

For those times when you find yourself caught behind a tree, or when you need to move the ball in a particular direction with a desired flight, knowing how to execute a hook or slice might just save you a shot or two. Likewise, some knowledge of hooks and slices can help you make minor swing adjustments to correct unintentional draws or fades.  

Following are some basic examples of what might typically cause a slice or hook. Of course, there are other factors to take into consideration – such as face angle at impact and weight transfer – though these examples are based on making contact with the club face square to the target line.

STRAIGHT
Imagine you are looking directly down on the ball. Now visualise a clock face around the ball (see image). 6 o’clock to 12 o’clock would form a line pointing directly at your target. In this first image you can see the blue line showing the club’s path being delivered square to the target coming from 6 o’clock through to 12 o’clock. This swing would typically result in a straight ball flight. You can see where the club would make contact with the centre of the ball in the smaller image (low right – this is the view of the ball from the rear). If you make contact low on the ball you will get a higher ball flight with more spin. If you make contact higher (towards the centre of the ball) you will get a lower ball flight with less spin.

Tip: Check your divot. If it matches the club path line (as shown in blue below) and you made contact with a square club face to the target, you should have hit a straight shot.

Straight Golf Swing

SLICE
The next example looks at a slice. The club comes down into impact with the ball from outside the centre line when seen from the rear (see image low right). This would be anywhere between 5 o’clock and 6 o’clock. The club continues to travel on this club path (seen in blue) exiting the ball between 11 o’clock and 12 o’clock. This causes the ball to spin in a clockwise direction, starting left of the target and finishing right of the target. This ball flight will tend to be higher due to the steepness of the swing – causing more backspin and landing softer with less roll. A great shot to learn if you want a high flight landing soft with plenty of spin. A great thing to note if you are trying to correct an undesired slice.

Tip: Check your divot. If it matches the club path line (as shown in blue below) and you made contact with a square club face to the target, you should have sliced the ball.

what causes a slice, slice, golf swing, golf swing plane

HOOK
Finally, let’s look at a hook. The club comes from the inside of the centre line (see image low right). This would be between 7 o’clock and 6 o’clock. The club path (blue) continues through the ball and exits between 12 o’clock and 1 o’clock. This puts anti-clockwise spin on the ball and makes the ball hook with a flight bending to the left. The ball will start to the right of the target and finish to the left of the target. This ball flight tends to be lower as the approach is shallower – more inside to outside, with more roll when it lands. This is a great shot to learn for use in strong winds or if you need to run the ball up to your target. A hook will also tend to travel further due to the reduction in spin. Again, a great thing to note if you are trying to correct an unintentional hook.

Tip: Check your divot. If it matches the club path line (as shown in blue below) and you made contact with a square club face to the target, you should have hooked the ball.

what causes a hook, hook, golf swing

These swing thoughts have always helped me out and with these understandings I have developed the ability to work the ball both ways. Next time you’re out for a practise, give these shots a go. Having the ability to move the ball both ways is very useful.

Luke @ Golf Blog Australia